
.jpg) (Early) February: Seed Starting
(Early) February: Seed Starting
February Gardening
So as we get more into the spring of gardening I will be blogging about what seeds I have started or planted directing into the garden and some images of how my new garden space is coming along as well!
First off a few weeks ago we added gravel in the greenhouse to help with draining and I love it! Makes it a bit more inviting as well!

The little peek of sun we had this day was shining right on my greenhouse...perfect!
.jpg)
This is my new garden space so if you think I am way ahead of you and you don't have any time left to get started just take a look at this picture! Nothing there yet and I still have to pick up all these massive rocks before I can re-till! This space is about 40x40. So you have plenty of time to get a garden going this season!!
.jpg)
I am doing a few experiments this year and since I have a good supply of seeds I will sow some seeds indoors but also try to direct sow the same seeds for some varieties. I am really excited about my milk jug creation in the greenhouse. In this I hope to have mostly lettuce and then some herbs that I can keep growing year round in here. My husband as so kind to build me this and I love how it takes advantage of the vertical space in the greenhouse.
So this month I put in those jugs so far just some mint plants I had still in their pots hanging out in the greenhouse all winter. I hope they survived as I didn't really tend to them but mint is pretty hardy. Since I have so many varieties of mint and it is rather invasive. I decided to put it in the jugs.
Here is that "invention". There are many ways to make this but hubby went this route and I like it. I like how it fans out up top which then makes my jugs not really get in the way of my footing below and the jugs angle outward for easier planting. Email me if you want to recreate this and I can give you more details!
.jpg)
Jugs slide on and off easily. The best jugs that work for this are the milk jugs from Costco. We go through ALOT of milk so this was doable for us.
.jpg)
Now some people will say I should direct sow into plastic but I am not THAT intense. I do like to reuse and recycle and I understand the whole "plastic" thing but mostly just herbs are going in these and greens. This will come in handy during the fall/winter gardening as well. Anyways, there are far more other things to be careful about I feel than possible plastic seeping into my soil and corrupting my crops!
Each lid of the jug I poked a hole in it with this tool linked below. I have to poke holes in the drip irrigation system which I am setting up in the greenhouse (more on that later though) so that is the tool I used and it worked well enough to create a little drainage hole. If you want to get one here is the tool. It is rather handy! (Drip Irrigation Hole Punch)
.jpg)
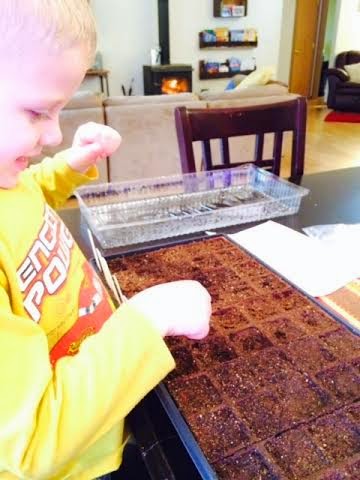
My little man got right to work and starting digging up some soil to mix in with the seed starting soil I had. He did a good job! He kept saying that "I need to check on my garden tomorrow." No clue why he was saying this maybe it sounded kind of like what I tend to say with the farm chores I do? haha! It as cute though and he was rather serious about it!
.jpg)
.jpg)
.jpg)
Mint plants replanted! I might have to separate them as they go nuts but for now will see if they even survived my laziness! I have orange, chocolate and spearmint! MMMM!!
.jpg)
.jpg)
Now onto indoor planting! I have a mini greenhouse which if you want one you can check out my past post from January as to where to get one and also see which large greenhouse I have in the pictures above. Plus if you missed January's gardening post you might want to start there first then come visit this post! (January Gardening Post)
Now let's get started on indoor sowing...
Supplies:
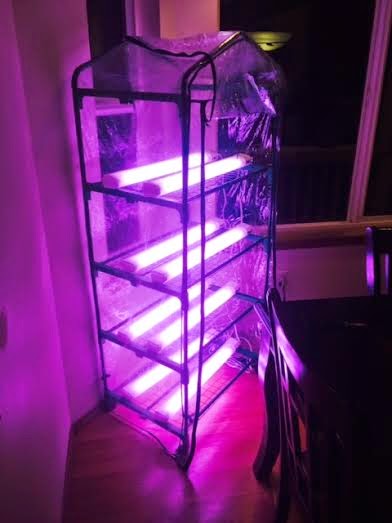
1. The mini greenhouse runs about $30 (got it last september) You don't need this though. All you need is a simple shelf or counter really that the seeds can hang out on for a few weeks.
2. Grow lights are at Walmart and run about $9 each (They fit perfect since they are 2ft long, same as my mini greenhouse)
.jpg)
.jpg)
3. Cake pans are $2+ each and you get two with lids (13x9 size)
.jpg)
4. I have a few different supplies for planting the seeds. Some seeds I used recycled K-cups and added organic seed starting soil from Home Depot. I also have growing trays but only 4 of them (plus the lids don't stay on well at all like the cake pans pictured above) that I added soil to and then I also had some leftover soil pods, which are the way to go! (Buy Some Now) I am waiting on my stock of them to come in so started with the supplies I had on hand left over from my fall gardening. Dont forget seed markers too!
.jpg)
.jpg)
.jpg)
5. A thermometer is recommended but not required. I like to just check and make sure things aren't getting to hot or cold and they are cheap. Just find one at Wal Mart or Home Depot.
.jpg)
6. Spray Bottle for easy watering during germination time.
7. Seed Planting Cheat Sheet! This is a must have buy for direct sow or indoor sowing of seeds! CLICK HERE to get yours now! (FYI: If you purchase seeds from MY SEED STORE, you automatically get a detailed description of how to plant your seeds you purchase!)
THE SEEDS:
So here is what I have started indoors in the mini greenhouse under lights.
| Tray 1 | Tray 2 | Tray 3 |
| Dill | Lemon Balm | Chives |
| Tarragon | Echinacea | Long White Onion |
| Cilantro | Comfrey | Leeks |
| Thyme | Yarrow | |
| Oregano | Lavender | |
| Sage | Sunflower | |
| Borage | ||
| Basil | ||
| Parsley | ||
| Stevia | ||
| Tray 4 | Tray 5 | Tray 6 |
| Artichoke | White Onion | Romaine Lettuce |
| Year Round Lettuce | Red Onion | Endive |
| Kale | Various Lettuce * |
*For the lettuce I am doing only doing romaine and leaf right now. Butter lettuce I will start March. This was what my pacific northwest book recommended.

.jpg)
.jpg)
.jpg)
I sprayed down the soil and made it moist (use lukewarm water to kind of warm up the soil). End of the pen cap or eraser side of a pencil make a hole for your seeds and cover and respray with water!
All Done!..FOR NOW!
Seeds are baking in the "sun": Lights are just set on top of the lid for now til things start sprouting. I will then zip tie the lights to the top of the shelves so you will need to figure out a way to hang the lights or do what I will be doing as the plants get taller. You will also need to possibly repot any that are not in the "pods." This is why I like the pods so much!
.jpg)
Also, if you are following along I recommend journaling your own progress so you know what to change next season!
Helpful Links:
I didn't want to loose these good resources so putting them on this post for my future reference as well as to help you all!
Stay Tuned for More Seed Planting and Progression of My Garden!

Happy Farming!
*Enjoy this read? Read all of my gardening posts HERE!
This was very helpful!
ReplyDeleteThanks glad I could help :)
Delete